
Table of Contents
Manual Mill
| Status | Operational as of February 2021 |
|---|---|
| Training | Required |
| Hackable | NO |
| Usage Restrictions | Members Only, only after VHS training / orientation |
| Owner | Mark Denny (friend of JohnC) |
| If it Breaks | Attach “Out of Order” sign / note. Post to Talk and Slack, contact area Champions |
| Loan Status | Long Term Loan |
| Arrival Date | November 2013 |
| Location | Machine Shop |
| Champion | See Compendium of Champions |

Safety
Always wear eye protection while using the mill. VHS-specific training / orientation is required. If used improperly, workpieces or pieces of cutting tools can be thrown around the shop at high velocity.
Specifications: Mill
Mill is a Long Chang LC-15A. Very little info for this mill is available online.
Please review this Basic Manual
The following information was measured from the mill and may be inaccurate.
Spindle Taper: MT3 - Morse Taper #3
Table: 1/2in T slots
Notes
To move mill head up and down (major vertical adjustment); you need to loosen two nuts on the right-hand-side of the head, and use the crank on the left-hand-side of the mill to raise or lower. Retighten securing bolts before use (when loose, crank has huge slop).
Axes
X/Y - handwheels on table
Z - large grab handle on right of mill, or handwheel on front of mill. Black locking ring on grab-handle on right of mill engages/disengages handwheel. This axis can be locked via the small black lever on the front-left of the mill head.
Fixtures
The 3.5“ swivel vise can be bolted to the table via T nuts / bolts. Never assume that the vise is aligned correctly; use a dial indicator to check.
We have a set of 1/2in T nuts + fingers + step blocks for the CNC mill that will also fit this mill.
Tooling
- Drill Chuck - at the moment, the only chuck key that fits is on the drill press in the Fab shop area. - 2x Offset boring heads - Fly cutter. Takes an HSS toolbit, ground to the correct profile - 1/4, 3/8 and 1/2 collets. Used to hold end mills, fly cutters, and the small boring head - 2.5” face mill. Needs to be replaced, as all the carbides are chipped, and are not available for purchase. Still works reasonably well - Drift keys. USe to remove the tooling from the spindle. See document (pending) for use. - (many more in varying condition) - (Most) tooling is located in the red toolbox in the end of the (pending) work bench.
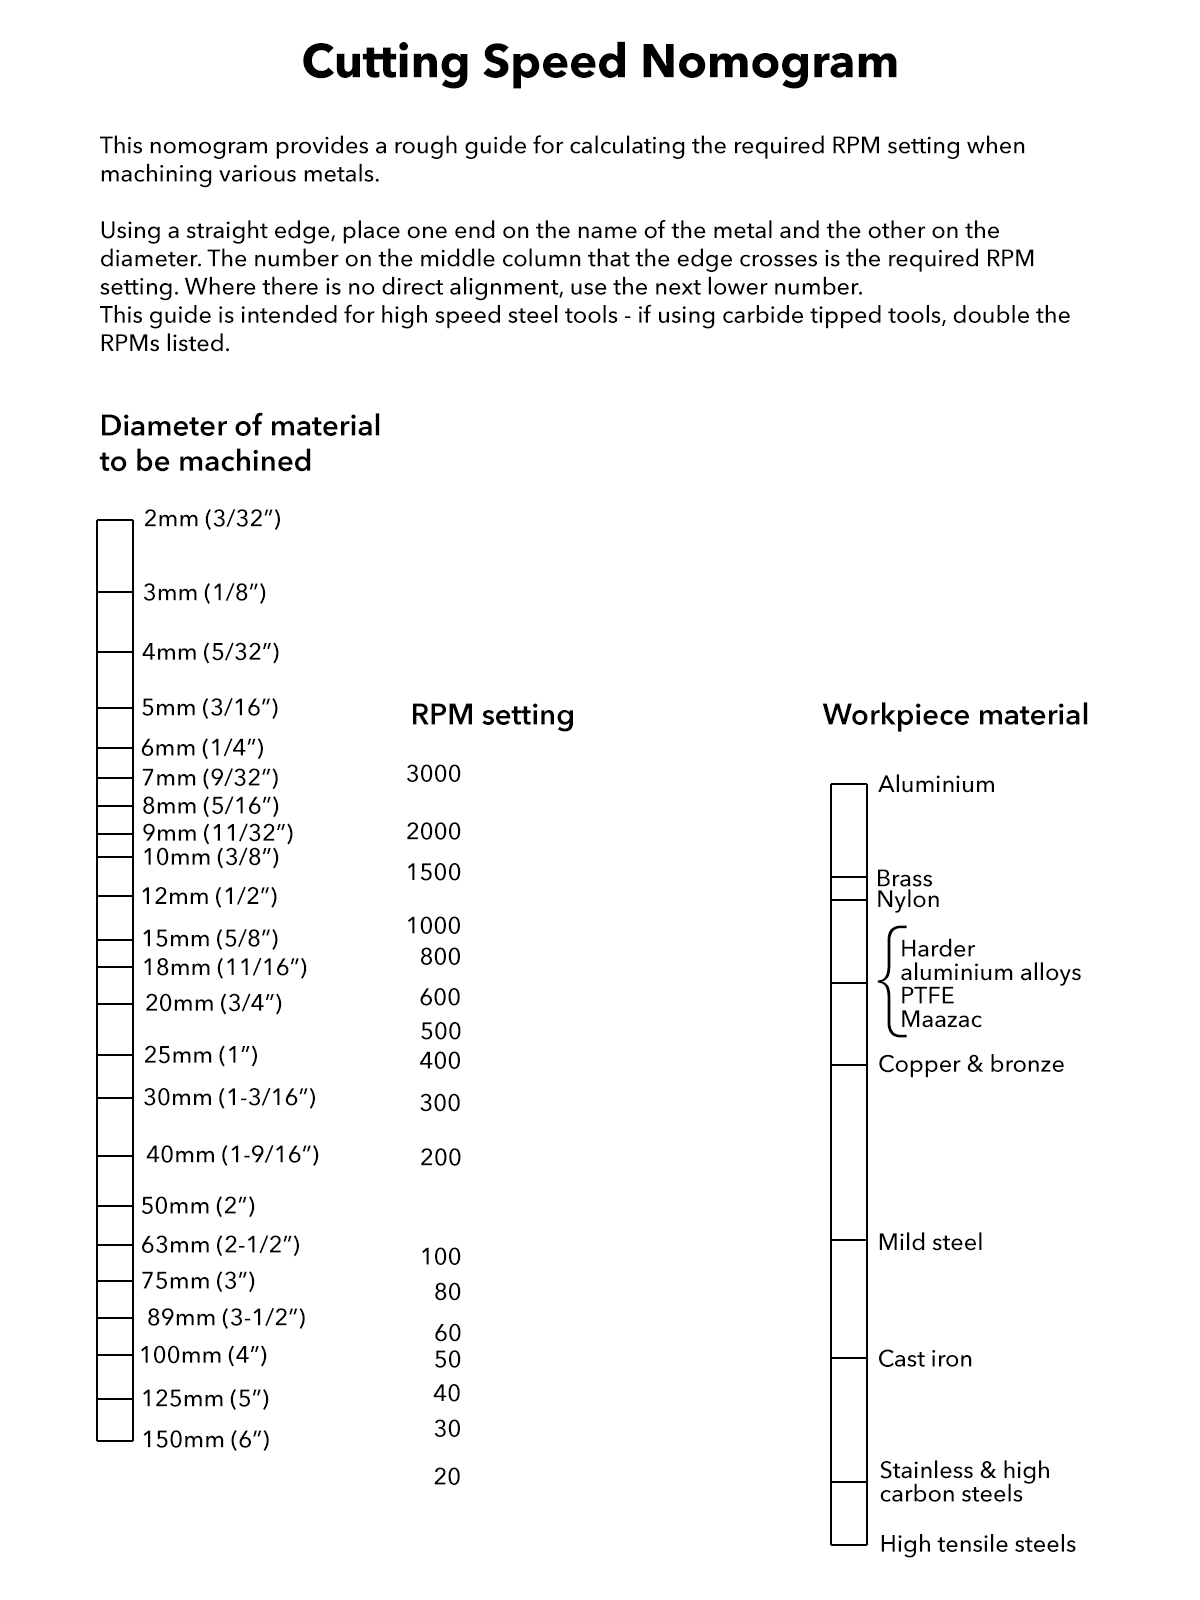
Speeds & Feeds
Cutting speeds can be determined easily by using this cutting speed nomogram. The original cutting speed nomogram came from Ian at the BCSME.
Tutorial
A written tutorial won't suffice! Don't touch the machine unless you've received training!
Maintenance Log
| Note | Date | Who |
|---|---|---|
| Wiki entry created | Nov 20, 2013 | Thomas L. |
| Wiki entry updated | Nov 27, 2013 | QuanaParker |
| Vice alined and bolted to table | Nov 26, 2013 | QuanaParker |
Tool/Work bench built   | Nov 26, 2013 | QuanaParker |
| New drawbar, drift keys | Feb 2020 | Billiam |